
here we go today with a special fold tutorial
 I am #29 on the list of blogs that are hopping. I am not sure if anyone else is doing anything today besides me.
Please keep in mind the deadline for EASTER cards is March 18 and MOTHER'S DAY is March 31 (in the shippers hands) and please check out some of the notes and video's on the Home Front , Hero and OWH websites
OK...today I am sharing what I call a CORRESPONDENCE Card, I call it that because when open it gives you lots of space to write, like stationary.


Ok, ready to continue class?


Please keep in mind the deadline for EASTER cards is March 18 and MOTHER'S DAY is March 31 (in the shippers hands) and please check out some of the notes and video's on the Home Front , Hero and OWH websites
OK...today I am sharing what I call a CORRESPONDENCE Card, I call it that because when open it gives you lots of space to write, like stationary.

Remember the "fortune tellers" we made as kids?

It is like that, but only made half way

See how big the writing space is? plus, there is some space on the back also without changing the look of the card when it is folded up.
Here is what you need:
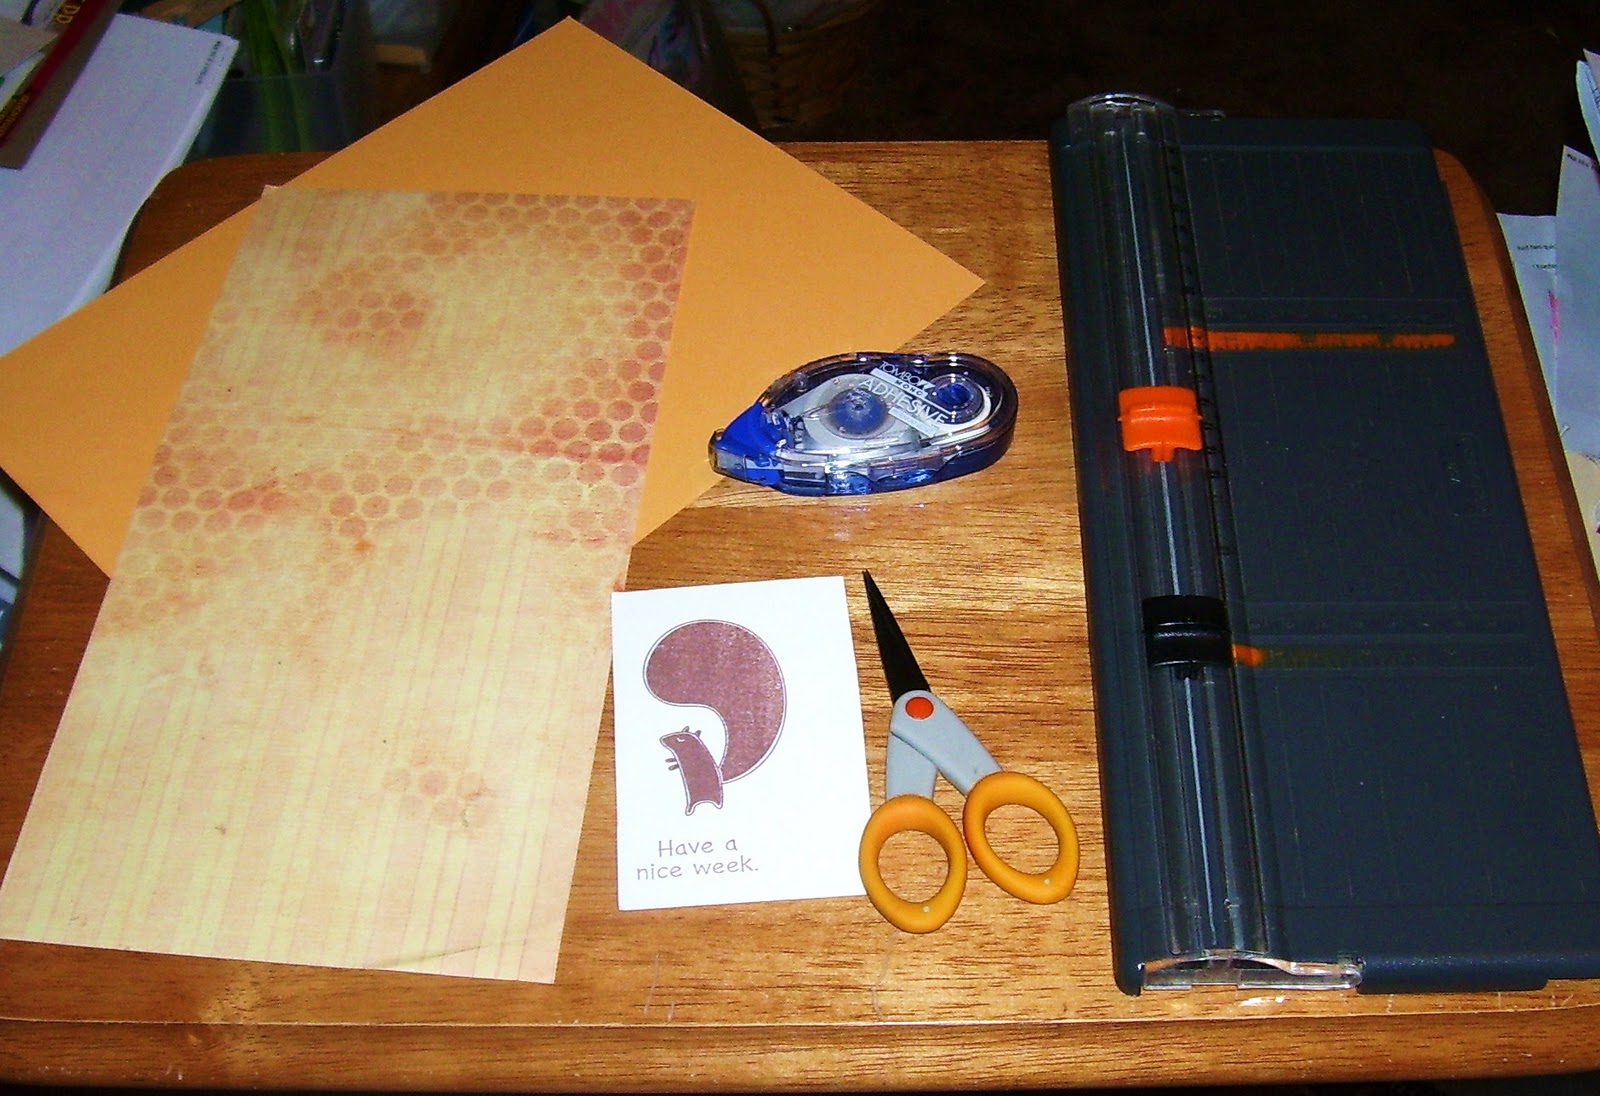
1 sheet 8.5 x 11 card stock, a piece of coordinating printed paper, a stamped image, trimmer, scoring tool, adhesive and scissors.
I did it all on my old trusty Fiskars...I did just recently purchase Martha Stewart's scoring board, but have not tried it yet.

First you are going to cut the paper at 8.5", so you end up with a square

On the Fiskars trimmers (all of them) the orange blade is for cutting, and the black is for scoring, Now that I have cut it, I do not need that blade, so I remove it for the time being.

Now you are going to score it in half (at 4.25") on both sides of the square


Then you need to score it diagonally from both sides, point to point
to do this on this type of tool, you line up the points in the groove, you MUST try to hold it steady and precise, or the folding will be off. Some people like using artist's tape, but I have become pretty good at keeping it steady (on good days with my hand, LOL)

you can see I have the points lined up with the groove on both ends, after scoring the first one, I turn it and do it again.

Start your folding

btw, when the scoring is done, you'll see like a star point in the center of the square

always do your half-square folds first


when doing the diagonal folds make sure the paper lines up

Is this starting to look familiar?


But we do have one more fold to make

Since this is an 8.5" square, when you fold it in half both ways (square), you'll get 4 squares measuring 4.25"

Pick one square and line up the end of the fold lines diagonally to the groove on the trimmer (or scoring board) again try to be precise. Score it all the way across.


Here you can see the score line


fold it down so it looks like a square, (the inside 2 folds fold inward)

Now fold this new short score line toward you

You can know use a bone folder, a credit card or whatever to make the folds crisp

From left to right, the one I just made, I have not used the boner on it yet, the middle one has been boned, and the last is the card that has been made for a while and in with other cards so it is nice and flat now.
Let's take a quick break and look at 2 spring cards I made:

all items are from Stampin' Up, a lot are retired...both stamp sets (Terrific Tulips and Spring Garden (i think)) The mint Melody Card stock is also retired. Top card, rubber inked and stamped and card spritzed a bit with water. I also used the "step corner punch".
Bottom card, direct to paper stamping and inking, slot punch used twice to make a double opening for me to thread the ribbon making a smooth looking bow.


Time to add our piece of coordinating printed paper. Put the cutting blade back in your trimmer (no need to remove the scoring blade, just put the cutting blade in front of it) Remember the 4 squares are 4.25", so we need to cut a piece of printed paper 4" x 4"


Once you have your 4" square, you need to cut that in half diagonally

Once you have cut it and half a triangle piece now, you need to remove just a bit off the top, or long side, like an 1/8" - 1/4" I eyeball it.

once it appears to be straight, go ahead and cut it.


Lay is down on your front flap, and make sure you are leaving the size of border you want to leave. Then glue it on.

Now it is time to cut out your stamped image.


Line your image up so it is not going over any of the edges, and it is where you like it.
*note: you really want there to be more of the image at the bottom as that is where it is glued, the rest kind of hangs in the air.
The image I choose actually goes a little against that rule, because of the squirrel's tail but it works out :)

Now embellish as you wish, just do not put anything real lumpy or it will not close right.

The squirrel is from Stampin' Up, German scrap from ARTchix studios, the flowers are Primas, the bling is part of a little bird "Bling it" by Basic Grey

I also finished the blue one, while I was at it :)

The purple shapes are foam, and the rhinestone border, was rec'd in a rak, each one is encased in plastic and attached with thread, really cool...I have enough of it left to use on an ATC :)

Love my Prismacolor pencils! the sentiment says To a very special Daddy on father's day...sentiment is from Raindrop Echo designs, the bear is from Designed to Delight
I hope you enjoyed this tutorial and put this card to use for our heroes, as it gives them lots of space to write on! There is blog candy for one lucky person that leaves a comment between now and 12 noon EST Tuesday. Picture coming up!
 Here is the candy: crafter's dozen (13 of each item listed) flowers, stamped images, stamped bkgds. yards of fiber +, and half yards of ribbon+
These cards also fulfill the challenge at Bugaboo
The green spring card Fulfills the challenge at Do You Stack Up

These cards also fulfill the challenge at Bugaboo
The green spring card Fulfills the challenge at Do You Stack Up
32 comments:
Awesome tutorial! I love these. I may have to make a couple after I get new blades for my cutter. Thanks for sharing.
Thanks for sharing this interesting tutorial. I love how much room there is to write and how the card folds!
What a WONDERFUL tutorial...I can't wait to try it...thank you for sharing and for the chance to win!!
I love your card design! I am going to have to try making one!
great tutorial... i guess it pays to be a late hopper - two days of candy... LOL
thanks for sharing and thanks for hopping - hope you had as much fun as me (even tho its taking me forever to make it thru)
This tutorial was great. I am always looking for new folds for cards and you are right, this is perfect for the troops. thanks for a great hop entry. I will be following also.
golly, I tried to leave a comment. apparently it did not take. fabulous tutorial.
Great tutorial. Worth the wait. I bookmarked it so I can study it again.
Thanks for the tutorial. I'll have to come back and take another look. Also loved the yellow Easter card.
Ann K
annjerryk at aol dot com
Wonderful card and great tutorial - I'm going to give it a try. Thanks for your kind words on my blog!
What a truly interesting way to make a card! I've never seen one done that way before, and i love it!!
Thank you for having a Day 2 ~ it has taken me 3 days to get thru this hop :)
Loved your mothers day card and appreciate the great directions onh making the folded card.
Mindy
Wonderful card, thanks for joining us at Do You Stack Up.
-Wenche
Great cards and tutorials! Thanks for playing along with us at Catch the Bug also!
Tammy :)
What a wonderful way to do a "card"! I hope I'll be able to accomplish one myself this week, I know my friends will love it! Thanks so much for sharing this.
Debbie ^i^
I love this tutorial. I wonder if this could be modified to be done by my Grands preschool class. I can see it with with a little bouquet of flowers and a loving message inside. Really, really cute.
Great card, I can't wait to try this. Great blog hop.
Thanks for sharing
karen k3 at ameritech dot net
Am so glad I came back again!! What a great tutorial! TFS. Great sping cards also!!
I always love how precise you are with your tutorials which is a good thing for people like me! lol This definately looks like something that the troops would love as well as the little old ladies that live in my building. I see you are using the Prismacolors, too. I adore mine! I know I'll never have Copics, but at least my grandkids think it's cool that their grandma colors with colored pencils, too! Love the blues on that second card, and I need to check into some of the images you used...what an enabler!!!!
Fab tutorial - must have taken you ages to sest that up. Great spring cards too
kitten DYSU team
Such a pretty card. Thanks for joining us at DYSU this week xx
Thank you for the tut!
Hummer Hugs,
Misty
http://deliteful-gifts.blogspot.com/
hummingbird204 at comcast dot net
Great tutorial. And thanks again for a chance at some goodies!
Hey Susan this was a great tutorial. I love the way you just put it all together.
Nicole/Beadwright
Wow Susan, what an amazing tutorial and cards!
Thanks so much for playin along with this week's Catch The Bug "Anything Goes" Challenge with Bugaboo Stamps! We hope you'll join us again soon!
Hugs & Happy Days!
~Min
My dd is going to love this tutorial - thanks for sharing!
Great tutorial! Beautiful cards, too! Thanks for playing along with us this week at DYSU.
What a GREAT fold and thanks for sharing your tutorial. Thanks for joining us this week at Catch the Bug!
Wonderful tutorial, Like that theres lots of room for writing!
hugs Lynn
This card is so adorable. Wonderful image and love how you colored the image. Thanks for joining us this week at Catch the Bug Challenge Blog for our March Anything Goes Challenge!! We Hope to see you again for our next challenge! Thanks Again, Tammy
Super cute card and a wonderful tutorial Susan. Thank you so much for visiting my blog and following. I’m now following you back!! ☺ I’ve spend a good deal of time this afternoon looking around your blog and have enjoyed your beautiful creations. Wish I had the time to comment on them all, but my little one’s are calling for me. LOL I did enjoy your eye candy post too!! :)
Hugs,
Wendy
super creative blog i am more than happy i have found u I really like your blog! It is amazing! :)
..Check out my blog, lets follow each other....
http://dtrh-stateofmind.blogspot.com/
Post a Comment